Planning an international trip often involves dealing with visa applications. In this post, I’ll share my journey of getting a UK Tourist Visa as an Indian passport holder. Join me as I break down the process into simple steps and provide helpful tips for fellow travelers.
Step 1: Applying Online and Paying Visa Fee
I started by visiting the GOV.UK website and filling out the online application form. Since I had helped my parents with their visa applications before, I decided not to use any premium services. The form had straightforward questions. I made sure to give accurate details about my employment and finances. Once done, I paid the fee for a 6-month visa. There were options for longer visas, but I chose 6 months as it was my first visit to the UK.
Step 2: Gathering and Uploading Documents
This step is crucial. The GOV.UK site listed the required documents. For a Tourist Visa, I needed:
- Current Passport (Mandatory)
- Proof of Funds (Financial Proof)
- Invitation Letter (I was visiting friends/family)
I also added some extra documents to support my application, like my National ID (Aadhaar), a letter from my employer, and scans of my old passport and visas. Remember to upload everything before your appointment at the VFS center. Otherwise, you’ll need to pay an extra fee for scanning.
Step 3: Biometrics and Submitting Documents
Once my documents were ready, I booked an appointment at the VFS center for biometrics (fingerprints and photo) and document submission. The time here varies based on the center’s crowd. If you didn’t upload docs earlier, you’ll pay more. The VFS folks might offer extra services like notifications or courier delivery. You can skip these unless needed. (They try to sell real hard!)
Step 4: Patience During the Wait
The wait time depends on the season and geopolitical situations. It can take as early as 2-3 weeks of as much as a few months! I had to wait for around 3 months for a decision (Pandemic + Ukraine War).
Note:
- If you find yourself needing your passport during this time, you can choose to keep it for a fee (₹3,500).
- In case you want quicker decisions, you can apply for a priority visa at a premium. You need to select this option while scheduling your biometrics appointment.
Step 5: Passport Collection
Once a decision is reached, you’ll receive a notification to collect your passport. UKVI generally doesn’t confirm visa approval, but they do provide reasons for rejections. This is the moment of truth, when you’ll finally know the outcome of your application.
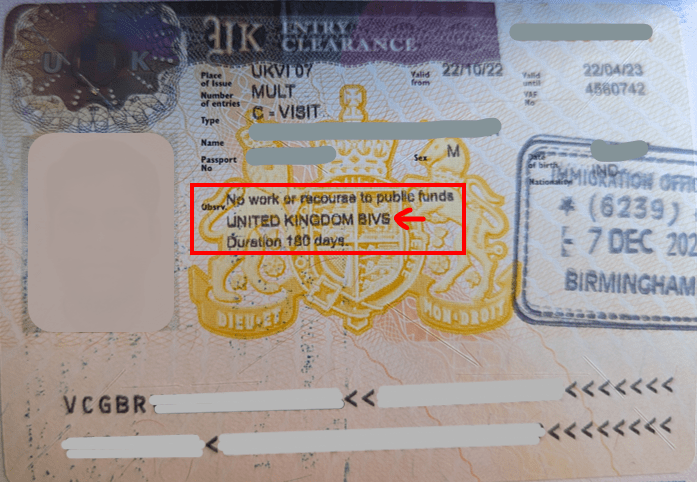
Bonus Tip: Check for the “BIVS” (British-Irish Visa Scheme) stamp on your visa. If it’s there (usually is for tourist visas), you’re in luck! This stamp allows you to explore the Republic of Ireland using the same visa, adding an extra dimension to your travel possibilities.


Leave a comment